A City Coop Story by Rocky The Rooster
City Chook's Coop Details
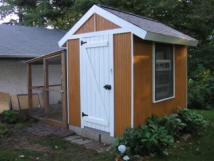
Foundation: Landscape block (9x16) over an existing cement paver pad. Floor is green treated lumber topped with 3/4 inch plywood.
Size: 6x8, 9 ft. tall
Features: 1 people door (78x30), 1 chicken door (15x15), 1 large nest box (16x23), 6 ft. roost, antique mason jar feeder and waterer, roof ridge cap and soffit ventilation, Tyvec weatherproofing paper, T1-11 siding sealed with weatherproofing stain in "cedar," 2 double pane double hung windows, beadboard, interior surfaces finished with oil-base primer and exterior latex, gabled roof with asphalt shingles, granite front step, antique brick paver entry, landscaping, electricity and fiberglass insulation.
Run: 6x8x6.5 with a slanted metal roof. Sided in 1/2 inch hardware wire and poultry wire with a walk-in door. Corner posts are 4x4 and base posts are 6x6 landscape timbers, all green treated and stained/sealed. All other construction is 2x4 studs. Corner posts are buried 12 inches and cemented in. Wire is attached with washers and screws.
Lessons Learned: What Rocky would do differently
- Double the budget. This is not a joke.
- Determine and SOLIDIFY the ventilation strategy BEFORE building. Create more ventilation than you think you will need. You can always close it up after the fact. Much easier to do this while the walls are not sealed up.
- Double the timeline.
- Put a window on the run side of the coop. Not only would this have created more natural sunlight and nice cross ventilation, but the run is covered, so this window would have been protected from weather.
- Make the run larger. Although I have figured 12 ft. per bird, I don't feel like they have enough room to scamper about. It makes me feel a bit guilty when I leave them in the run for more than a couple days. Also, the 6x6 landscape beams took up more space on the ground level than I anticipated, making the run feel smaller.
- Install windows upside down if possible so that you can adjust airflow from the TOP of the window, reducing draft at bird level.
- Double my budget. Ooops - was that my out-loud voice?
Fave Features: Details Rocky liked best
- Paint the interior a nice LIGHT color that makes you smile when you show it off. Believe me when I say that people will want to see your coop. Use semi-gloss exterior paint for easy cleaning and good sunlight reflection. PRIME PRIME PRIME first. Do the floor while you're at it.
- If you live where you get a fair amount of snow or rain, raise your whole coop off the ground. It will stay so much drier.
- Install the largest windows you can afford. Craigslist is a great place to look. Don't be shy - ask around - many friends had windows in their garage that they wanted to give me AFTER the fact. Rats. I also like having the windows at roost level - the girls seem to like sunbathing there on chilly days. The Eastern window is nice for sunrise.
- Because of limited space, Rocky made the nest box a single, large, "trough-like" design. All 4 can fit in there comfortably and they seem to like to share. Also, the box is right next to the front door, so it's easily accessed without walking in to the coop.
- Cut the people door/pop door about 6-9 inches above the floor if you are planning on doing the deep litter method. Much tidier.
- If you live in a genuinely cold climate, then quit being a tightwad and insulate your coop. It will help you sleep at night.
- Putting 4 inches of sand in my run was one of the best moves we ever made. The stuff is awesome and the chicken footprints make me laugh. Who knows why.
And last but not least, even though I endured ENDLESS teasing, Rocky's glad that he spent the extra time and money to make this an attractive addition to our backyard. It's easy on the eyes and keeps the neighbors happy. This is particularly important if you live in the city. Heck, my next door neighbor actually brings people over for tours!
|